Appwrite Hashnode Hackathon
Table of Contents
Team Details
Description
Tech Stack
Gitlab Link
Demo
Team Details
Salut Coders, In today I will walk through with you how to develop Chat Application using Flutter and Appwrite as baas. We will start by creating Splash Screen up until will send an Image Message. You will be familiar with Appwrite Authentication, Appwrite Database, Appwrite Storage, Writing Database Queries, Appwrite Real-Time and many more. Let's get started. This project was taken individually.
-Marshall Chabanga
Description
I decided to develop a Chat Application with Flutter and Appwite. The application is cross-platform and it will be running on iOS, Android and Web platforms. The goal was to provide coders with the best way of developing Realtime Chat Applications with Flutter and Appwrite using two open-source technologies. I created the Flutter project from scratch and added all the necessary dependencies that are required to deliver this project.
I managed to integrate with Appwrite so easily with their dependency version ^9.0.0. At first, I thought it would be difficult but after creating the project everything started to flow. I decided to use Phone Session Authentication. An OTP was sent for Mobile Number Verification.
After Phone Number verification, I persisted a user and update the user profile picture and then navigate to the dashboard. I implemented phone number synchronisation with the users that are registered with the chat application. if you have a contact that is using the application, the user will be able to send a text message or image. the concept is to show how the Appwrite Storage works and display these images.
I decided to develop a chat application because it has all the features that every developer needs to know from Authentication, real-time, Storage and Database Storage. The Appwrite Flutter SDK made me easy to develop the chat application in a limited time frame.
Tech Stack
Flutter
i used Flutter Framework so that I would develop multi-platform applications with one source code. it is a modern framework that you can feel it. It is easy to create Mobile Applications as compared with other frameworks out there and it has great documentation. The other thing is that it is supported by Google and it has evolved very fast within a short period.
Appwrite Integration
As I mentioned before, I used appwrite flutter dependency version ^9.0.0 I created a singleton class called AppWriteClientService.dart with the following code for creating a client.
import 'package:appwrite/appwrite.dart';

class AppWriteClientService {

        Client getClient() {
            return Client()
            .setEndpoint('https://cloud.appwrite.io/v1')
            .setProject('your_project_id_here');
        }
}
Create Phone Session
I used Appwrite Client to invoke Appwrite services. I created a Phone Session in my AuthBloc. I used Kiwi dependency for dependency injection so that I will able to the class AppWriteClientService.dart
class AuthBloc extends Bloc<AuthEvent,AuthState>{

final AppWriteClientService _clientService= KiwiContainer().resolve<AppWriteClientService>();

    loginWithMobileNumber(MobileNumberLoginEvent event, Emitter<AuthState> state) async {

            emit(LoadingLoginAuthState());
            try{

            Account account = Account(appWriteClientService.getClient());

            String mobileNumber = event.mobileNumber;
            Token token = await account.createPhoneSession(
            userId: mobileNumber.substring(1), //+32444444
            phone: mobileNumber,
            );
            emit(SuccessLoginAuthState(token));
            }on AppwriteException catch (exception){

            print(exception);
            emit(FailureLoginAuthState("Error, please try again later"));
            }
    }
}
Phone Session Confirmation
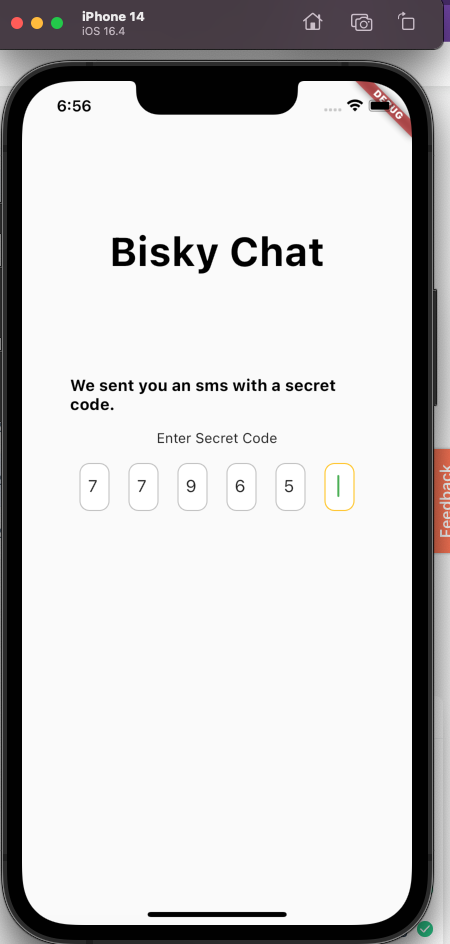
After I entered a phone number I received a 6-digit OTP to verify the mobile number. I used the below code
mobileNumberVerification(MobileNumberVerificationEvent event, Emitter<AuthState> state) async {


        emit(LoadingOtpVerificationAuthState());
        try{

        Account account = Account(appWriteClientService.getClient());

        Session session = await account.updatePhoneSession(
        userId: event.userId,
        secret: event.secret,
        );

        emit(SuccessOtpVerificationAuthState(session));

        }on AppwriteException catch (exception){

        print(exception);
        emit(FailureOtpVerificationAuthState("Invalid code supplied"));
        }

}
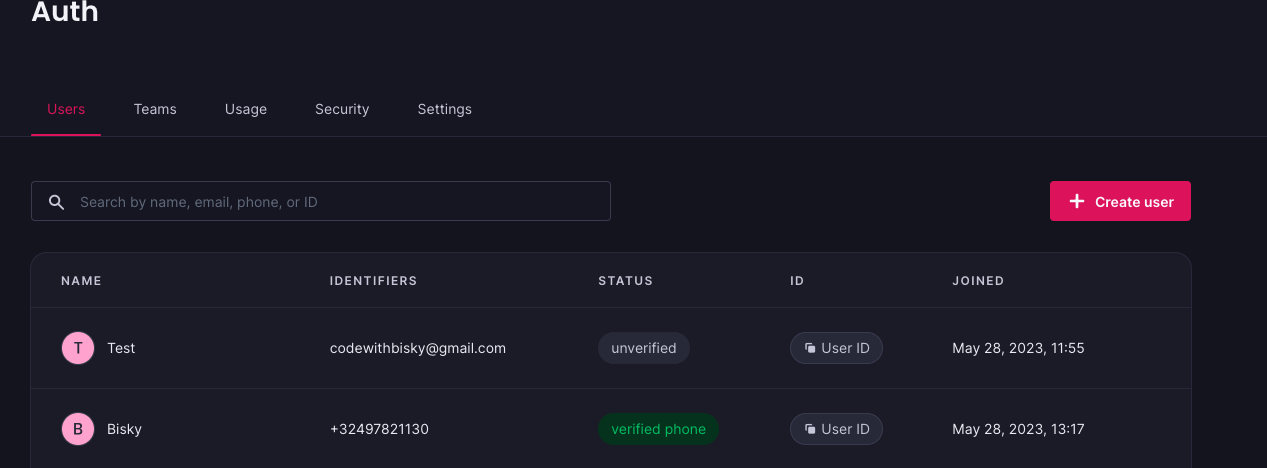
After A successful Verification of a phone number, the phone number is marked as verified like this.
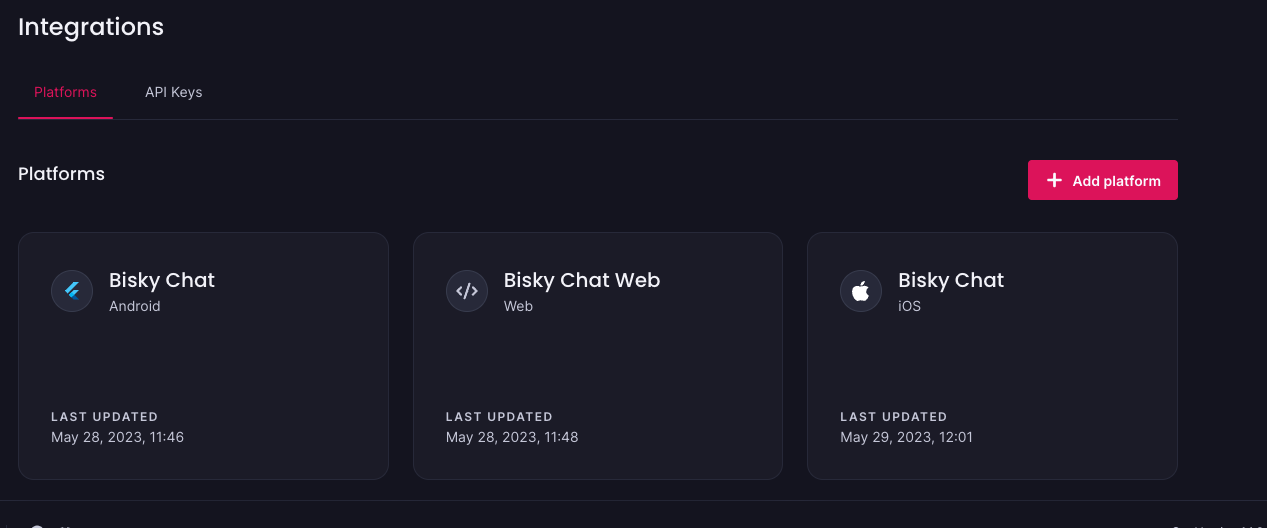
Before I created A login Screen I added iOS, Android and Web Platform so that my application would be able to be recognised with Appwrite. The platform integration was easy to set up for me to get started.
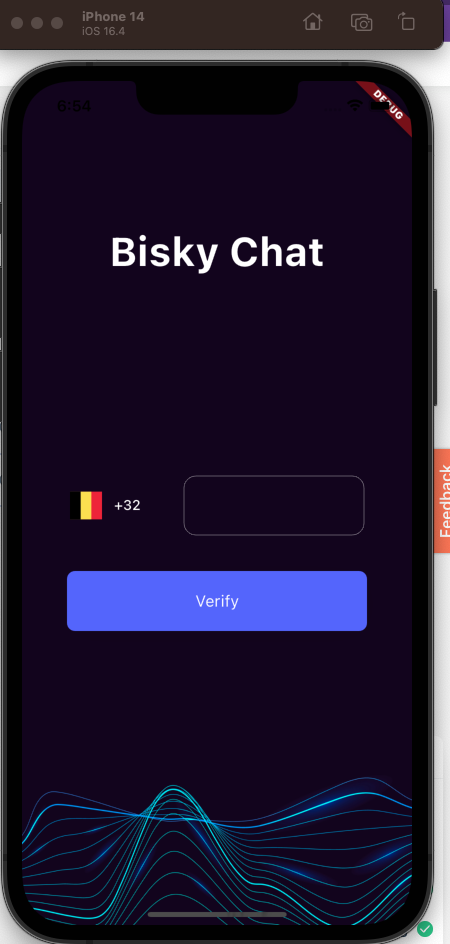
Login Screen
Phone Session Verification
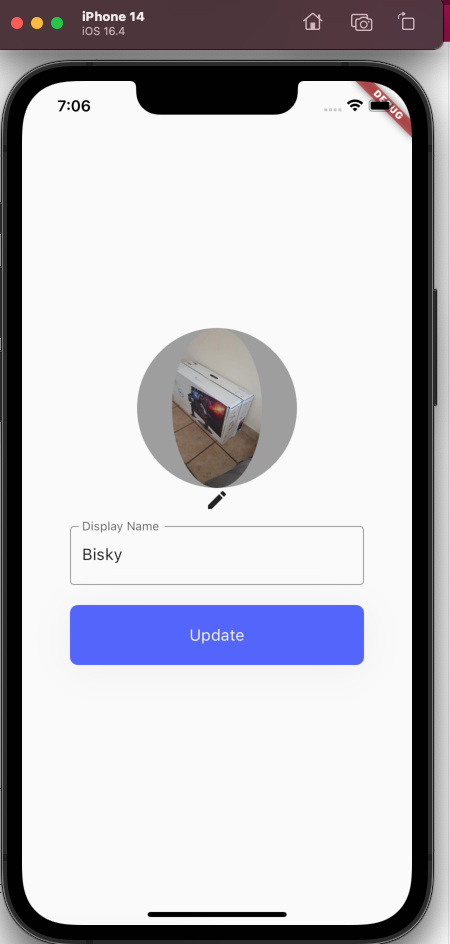
After the Phone Session verification I was able to use Users' profile pictures on Appwrite Storage
Appwrite Storage (Upload Profile Picture)
I used the Storage class for me to able to save users' profile pictures. Below is a code snippet.
uploadProfilePicture(UploadProfilePictureEvent event, Emitter<AuthState> emit) async {

            try {

            emit(LoadingUpdateAuthState());
            Storage storage = Storage(_clientService.getClient());
            if(event.imageExist != null && event.imageId != event.imageExist){
            await storage.deleteFile(
            bucketId: Strings.storageUserPhotosBucketId,
            fileId: event.imageExist!,
            );
            }

            File result = await storage.createFile(
            bucketId: Strings.storageUserPhotosBucketId,
            fileId: event.imageId,
            file: InputFile(path: event.path, filename: '${event.imageId}.${getFileExtension(event.path)}'),
            );
            emit(UpdateProfilePictureSuccessState(result));

            } catch (exception) {
            if (kDebugMode) {
            print(exception);
            }
            emit(const UpdateNameFailureState("Failed to update profile image"));
    }
}
Get File Preview
    getFilePreview(GetExistingProfilePictureEvent event, Emitter<AuthState> state) async {
              String userId = event.userId;
            try {
            Storage storage = Storage(_clientService.getClient());
            Uint8List imageBytes = await storage.getFilePreview(
            bucketId: Strings.storageUserPhotosBucketId,
            fileId: userId,
            );

            emit(GetExistingProfilePictureSuccessState(imageBytes));

            } on AppwriteException catch (exception) {

            if (kDebugMode) {
            print(exception);
            }
            emit(GetExistingProfilePictureFailureState(Strings.avatarImageUrl));
    }
}
It was easy to get the preview of the profile picture uploaded.
Create or Update Users for Contact Synchronisation
I used the Flutter Database class to create and update a document. below is a sample code. If the user does not exist. I would create a new one with the following method databases.createDocument() or I would update the record with databases.updateDocument()
I first check if the document exists. if it doesn't exist, we get 404 code. This is the code to get an existing document
databases.getDocument(databaseId: Strings.databaseId,
                    collectionId: Strings.collectionUsersId,
                    documentId: userId);
Create a User in the users collection
initializeUser(InitializeUserEvent event, Emitter<AuthState> state) async {

        String userId = event.userId;
        Databases databases = Databases(_clientService.getClient());
        UserAppwright user= UserAppwright(id: userId,name: event.name,imageId: event.imageId);
        try {
        databases.getDocument(databaseId: Strings.databaseId, collectionId: Strings.collectionUsersId, documentId: userId);
        await databases.updateDocument(
        databaseId: Strings.databaseId,
        collectionId: Strings.collectionUsersId,
        documentId: userId,
        data: user.toJson(),
        );

        } on AppwriteException catch (exception) {

        print(exception);

        if (exception.code == 404) {
                await databases.createDocument(
                databaseId: Strings.databaseId,
                collectionId: Strings.collectionUsersId,
                documentId: userId,
                data: user.toJson(),
                );
        }
    }
}
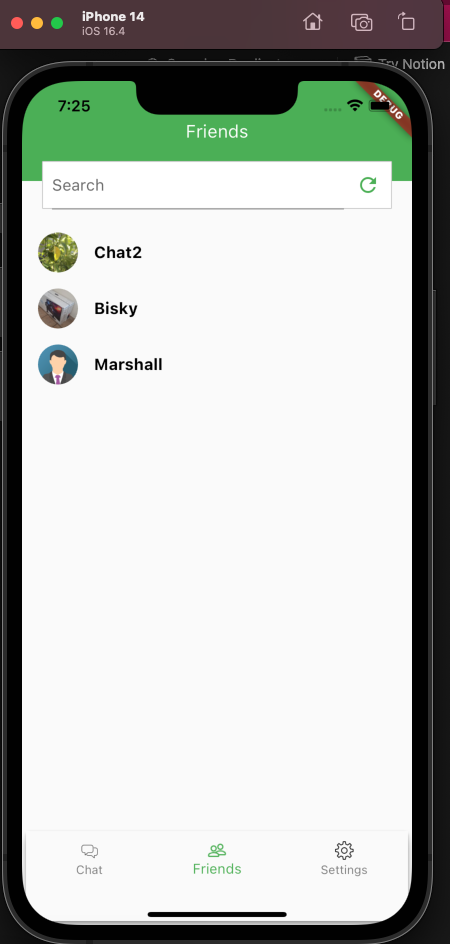
Phone Number Synchronisation
I fetched other users that are using the chat application by checking existing users that I saved in user's collection after account creation. I created a FriendsBloc.dart read phone contacts.
getContactsList(ContactsListEvent event, Emitter<FriendsState> emit) async {
            emit(LoadingContactsListState());
            if (kIsWeb) {
                return;
            }
            try {
            List<Contact> contacts =
            await ContactsService.getContacts(withThumbnails: false);
            if (contacts.isNotEmpty) {

            List<String> mobileNumbers = [];

            String userId =
            await LocalStorageService.getString(LocalStorageService.username) ??
            "";

            Map<String,List<String>> contactsMap = {};
            for (Contact contact in contacts) {
            if (contact.phones != null && contact.phones?.isNotEmpty == true) {
            for (Item item in contact.phones!) {
            String? phone = item.value;

            if (phone != null) {

            phone = phone.replaceAll(" ", "");
            if (phone.startsWith("+")) {
            phone = phone.substring(1);
            } else if (phone.startsWith("0")) {
            String dialCode = await LocalStorageService.getString(LocalStorageService.dialCode) ?? "";
            phone = "$dialCode${phone.substring(1)}";
            }

            phone = removeSpecialCharacters(phone);

            if(phone.isEmpty){

            continue;
            }

            if(mobileNumbers.length >= 100){

            contactsMap[const Uuid().v4()] = mobileNumbers;
            mobileNumbers = [];
            mobileNumbers.add(phone);

            }else{
            mobileNumbers.add(phone);
            }

        }
    }
  }
}
            if (mobileNumbers.isNotEmpty) {

            contactsMap.forEach((key, value) async {
            try {
            Databases databases = Databases(_clientService.getClient());
            DocumentList documentList = await databases.listDocuments(
            databaseId: Strings.databaseId,
            collectionId: Strings.collectionUsersId,
            queries: [
            Query.equal('id', value)
            ]);


            if (documentList.total > 0) {
            // has friends
            List<MyFriend> myFriends = [];
            for(Document document in documentList.documents){
            UserAppwright user = UserAppwright.fromJson(document.data);


            MyFriend friend = MyFriend(
            id: const Uuid().v4(),
            mobileNumber: user.id,
            displayName: user.name,
            userId: userId);
            myFriends.add(friend);

            }
            createFriends(myFriends);
            } } catch (exception) {
            print(exception);
            }


            });
            }
            }

            // emit(SuccessContactListState());
            } catch (exception) {
            print(exception);
            emit(ContactListFailureState("Error occurred please try again alter"));
    }
}
Get Realtime Messaging
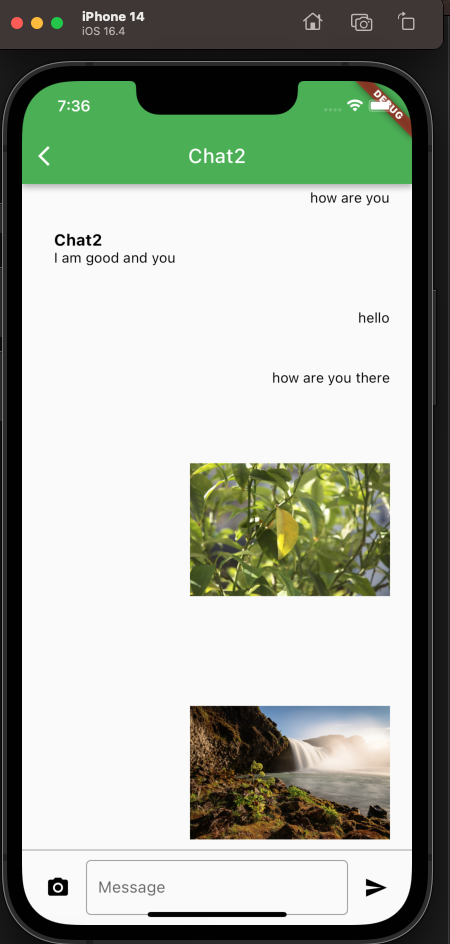
After selecting a user who is using the application I then started to chat with the user. I implemented real-time messaging by using Appwrite RealtimeSubscription class.
getMessages() {
        String key = "${widget.senderUserId}${widget.myUserId}";
        String key2 = "${widget.myUserId}${widget.senderUserId}";

        final realtime = Realtime(_clientService.getClient());

        subscription = realtime.subscribe([
        'databases.${Strings.databaseId}.collections.${Strings.collectionChatsId}.documents.$key',
        'databases.${Strings.databaseId}.collections.${Strings.collectionChatsId}.documents.$key2'
        ]);
        subscription?.stream.listen((response) async {

        BlocProvider.of<ChatBloc>(context).add(MyMessagesEvent(
        senderUserId: widget.myUserId, receiverUserId: widget.senderUserId));

        String userid =
        await LocalStorageService.getString(LocalStorageService.username) ?? "";
        BlocProvider.of<ChatBloc>(context).add(MyChatsEvent(userId: userid));
});
}
Sending A Message
This is the code snippet for sending a message. You can check the full code on the GitLab repository.
sendMessage(SendMessageEvent event, Emitter<ChatState> emit) async {
        try {
        Databases databases = Databases(_clientService.getClient());

        Document document = await databases.createDocument(
        databaseId: Strings.databaseId,
        collectionId: Strings.collectionMessagesId,
        documentId: const Uuid().v4(),
        data: event.message.toJson(),
        );

        print("message created ${document.$id}");

        // create chats
        MessageAppwrite message = event.message;

        String key = "${message.receiverUserId}${message.senderUserId}";
        String key2 = "${message.senderUserId}${message.receiverUserId}";
        ChatAppwrite chatAppwrite = ChatAppwrite(
        message: message.message,
        displayName: await getDisplayName(message.senderUserId ?? "") ?? "",
        createdAt: DateTime.now(),
        receiverUserId: message.receiverUserId,
        senderUserId: message.senderUserId,
        type: message.type,
        count: 0,
        key: key,
        messageSeen: false);

        try {
        Document documentChat = await databases.getDocument(
        databaseId: Strings.databaseId,
        collectionId: Strings.collectionChatsId,
        documentId: key);

        ChatAppwrite retrieved = ChatAppwrite.fromJson(documentChat.data);
        chatAppwrite.count = retrieved.count ?? 0 + 1;

        await databases.updateDocument(
        databaseId: Strings.databaseId,
        collectionId: Strings.collectionChatsId,
        documentId: key,
        data: chatAppwrite.toJson(),
        );

        String? senderUserId = chatAppwrite.senderUserId;
        String? receiverUserId = chatAppwrite.receiverUserId;
        chatAppwrite.senderUserId = receiverUserId;
        chatAppwrite.receiverUserId = senderUserId;
        chatAppwrite.displayName =
        await getDisplayName(message.receiverUserId ?? "") ?? "";

        createSecondUser(chatAppwrite, key2, databases);
        } on AppwriteException catch (e) {
        print(e);

        if (e.code == 404) {
        await databases.createDocument(
        databaseId: Strings.databaseId,
        collectionId: Strings.collectionChatsId,
        documentId: key,
        data: chatAppwrite.toJson(),
        );

        createSecondUser(chatAppwrite, key2, databases);
        }
        }
        } catch (exception) {
        print(exception);
        }
}
SAMPLE CHAT SCREEN
![Bisky Chat App -[Real-Time Messaging]](https://cdn.hashnode.com/res/hashnode/image/upload/v1686685826867/e3b6de25-8820-406e-82e9-b547f6974ea5.png?w=1600&h=840&fit=crop&crop=entropy&auto=compress,format&format=webp)
